
# Type at least 1 character to search # Hit enter to search or ESC to close
Cart


Hello, stitching world! It is a stunning day in Cape Town and it's difficult to think about working, but I have not written a blog for quite a while. Have been busy with some beautiful new projects and I have been doing step-by-step photography to show embroiderers how it is done.
I often wonder if readers really know how much time it takes to create step-by-step photographs! It never ceases to amaze me, every single time I write new instructions. But the effort and time and concentration and planning make it all worthwhile when we receive positive feedback from an embroiderer to say how much she or he enjoys learning and creating from my kits.
And so... I thought I would show you how to make a beautiful butterfly – the Pearl Spotted Emperor Butterfly from my Roses in silk and organza ribbon book.
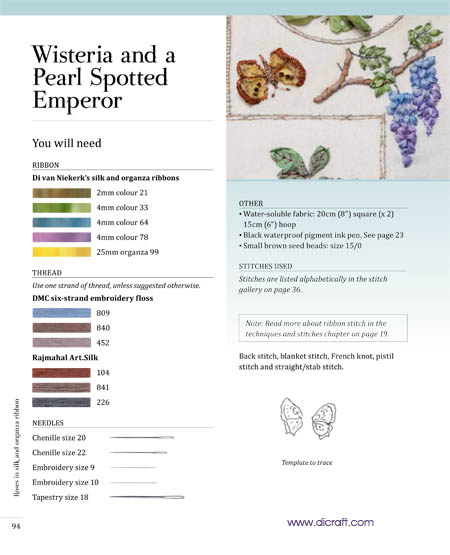
Firstly, you need to download and print the page which contains the wing templates along with the what you will need list here.
The page may take a while to appear on your screen due to the size of the PDF.
Note: The page contains the list for both the Wisteria and the Pearl Spotted Emperor Butterfly.
For the butterfly, you will only need the threads and ribbon listed in the step-by-step instructions that follow.

The Butterfly - A Pearl Spotted Emperor
Make the butterfly’s body and antennae

Working on your design (before you add the wings), fill in the body of the butterfly with the No. 452 thread.
Make French Knots closely together, wrapping the thread twice around the needle.
Use the same thread and make the antennae in Pistil Stitch, again wrapping the thread twice around the needle.
Use dark grey thread and make French Knots or Straight/Stab Stitches to form the darker shadows on the body.
Change to the No. 104 thread and make French Knots on the tip of each antenna.
With the same thread, make the stripes on the body with a Straight/Stab Stitch.

Make the butterfly’s wings
Click on the images to enlarge

Place a 20 cm (8”) length of the No. 99 Organza Ribbon between two layers of water-soluble fabric and insert the layers into the 15 cm (6”) hoop.
Cut the corners of the water-soluble fabric so they won’t be in your way when you stitch.

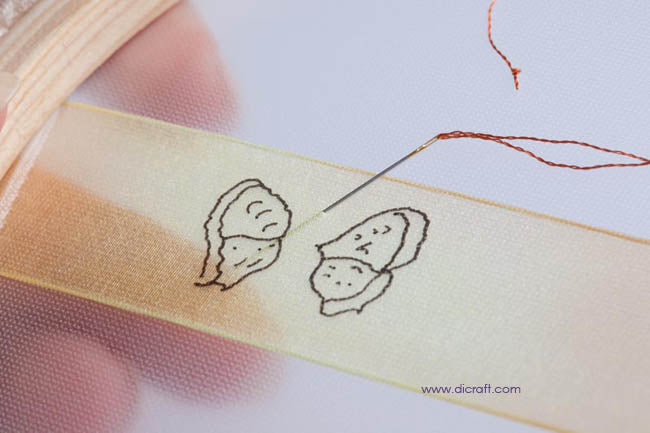
Trace the wings.
The wing templates are on the page that you will have downloaded and printed.

Turn the hoop over so that the fabric lies flat on the tracing paper. Trace the wings onto the water-soluble fabric as shown in the picture above.
Use the No. 104 thread and make a knot at the long end. Come up on the outside of the wing and make a stitch to reach the centre vein. Work through all the layers and make three Back Stitches, one on top of another, to secure the thread.

Fill in the vein on the wing with tiny Back Stitches.

Use Blanket Stitch to form the brown tips on the wing. Work with a gentle, even tension, stitching through all the layers. Use tiny Back Stitches along the edges of the wing and end off by running the needle under the stitches at the back.

Use the No. 841 thread and make one-wrap French Knots and small Stab Stitches to add more texture. End off by running the thread under the stitches at the back.

Add three seed beads on each wing, securing each bead two or three times so that it fits snugly on the fabric.

Cut out each wing and place them in a bowl of cold water for a few minutes until the water-soluble fabric has dissolved.

Place the wings on a towel and pat gently to remove excess water.

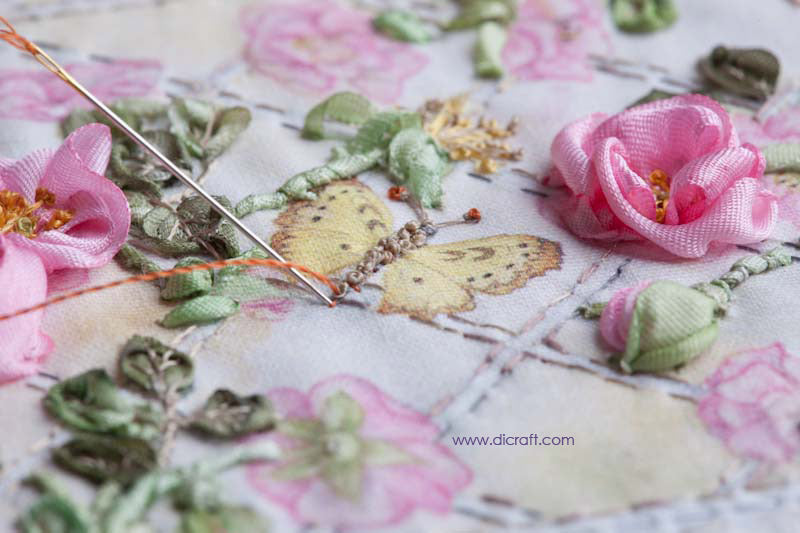
Whilst still slightly damp, secure the wing onto the design with the No. 841 thread. Use tiny Stab Stitches where the wing meets the body and stitch through all the layers.

Optional: Use the same thread and tiny Stab Stitches to catch the top and bottom edge of the wings — the stitches will help to tuck the wing in so that the free edge lifts up for a natural finish.
I hope you will make many little butterflies for your creations. This lovely butterfly can be used on cards and journals, knitwear and dresses, hats and hairbands — whatever takes your fancy. For more information about the book, you are welcome to look here.
Enjoy your day and happy stitching!
Love
Di

Get regular newsletters packed with tips, specials and new products!
Copyright © DI VAN NIEKERK. ALL RIGHTS RESERVED.
Added to cart successfully!

Leave a comment