# Type at least 1 character to search # Hit enter to search or ESC to close
Search
Browse by Category
-
-
Silk Ribbon and S...
Apr 05, 2025 -
Beautiful Ribbon ...
Mar 22, 2025
Recent Posts
- April 2025
- March 2025
- February 2025
- January 2025
Blog > An Embroidered Picket Fence by Di van Niekerk

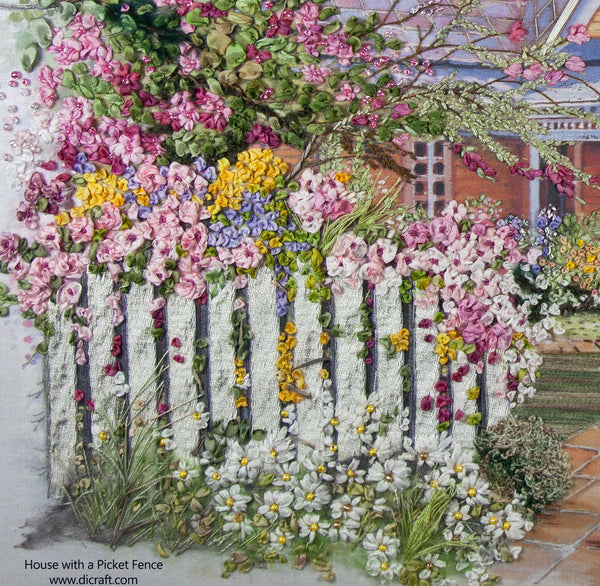
Hi, hello from a hot and windy Cape Town. I thought you would like to learn how to embroider this lovely picket fence from one of our kits. Let me show you how...
.

.
We use Perlé 12 thread for this technique as it tends to have a neater (and prettier) texture than plain floss.
Fill in one fence pole at a time. Working with the fence in the upright position, make horizontal foundation stitches in straight stitch. These stitches are about 2 to 4mm apart, set at regular intervals, taking up the width of the pole. The foundation stitches need to be quite taut and equidistant throughout.
.

Then turn your work for easier stitching and working from left to right, insert the needle under and over the foundation stitches as shown in the diagram above.
Take care not to pull the thread too tight. The needle faces the emerging thread each time and the long, looped thread faces downwards every time. For an interesting variation, skip one foundation stitch inserting the needle under every second stitch.
Hint: Push the rows of stitches close together with your fingertip so the stitches are packed nicely and tight. This raised effect is more interesting!
To complete the fence, use a dark charcoal or grey thread (Perle 12 or you can use one or two strands of floss) and make a row or two of stem stitches alongside the white poles to create the shadows.
Then you can add leaves and flowers on top of the white stitches with silk ribbon and thread.
If you are interested in making this lovely piece, you are welcome to see more info here.
Have a lovely week stitching world and don’t forget to send me pictures of your embroidery, I so love seeing what you are making!
Love
Di
♥
Shop Dicraft
Browse Dicraft
General Info
Get regular newsletters packed with tips, specials and new products!
Copyright © DI VAN NIEKERK. ALL RIGHTS RESERVED.


Leave a comment