# Type at least 1 character to search # Hit enter to search or ESC to close
Search
Browse by Category
-
-
Silk Ribbon and T...
Feb 17, 2025 -
Antwerp Edging
Feb 16, 2025
Recent Posts
- February 2025
- January 2025
Blog > How to embroider a tree ...

Hi everybody — hope you are well and looking forward to the weekend.
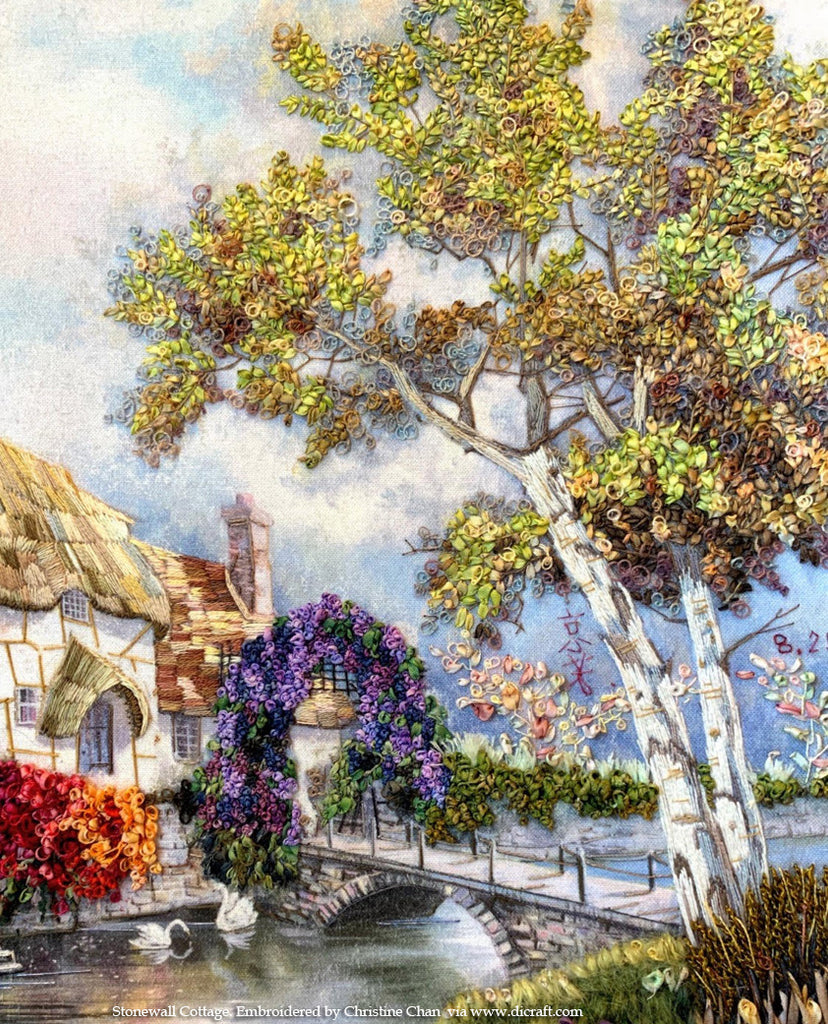
Today I thought I would show you how to make a tree in ribbon embroidery...
These trees are found in my Dreamscapes book from the Swan Cottage design.
The green tree
Make the branches
The branches of the tree are formed with wool. Choose chenille or velvet-like corded wool or any wool of similar appearance.
1. Secure the wool onto your fabric by couching it in place with a matching thread.
Note: You needn’t take the wool to the back of your work as it will be covered by the leaves a little later.
2. Make the pale cream branches: use two strands of a cream thread and make two rows of stem stitch close together, working alongside (and on top of) the woolly branches.
Make the small leaves in the background
1. Use one strand of golden brown thread and fly stitch to form the tiny V-shaped branches in the far back ground, between the green leaves on the outer edge of the tree.
2. Use mauve thread and repeat for the mauve shadows behind the tree.
3. Change to golden brown thread and add a few loose French knots between the green leaves, wrapping the thread once or twice around the needle.
Hint: To make a loose French knot: wrap the thread loosely around the needle and hold the wraps until you have taken the needle and thread to the back of your work.
Add a few mauve French knots too.
4. Form the very dark green shadows on the tree. Thread up with one strand of dark green thread and use French knots, wrapping thread once or twice around your needle.
Make the large leaves.
1. Use golden brown 2mm no. 20 silk ribbon and ribbon stitch to form the brown green leaves.
Work from the centre branches outwards, making the stitches loose and puffed by working over a spare tapestry needle or similar object.
2. Change to beige 2mm ribbon no. 109 and make the golden coloured leaves in the same way.
Add a few more leaves in fly stitch.
3. Complete the tree. Add the light green leaves (as you did above) in olive green 4mm silk ribbon no. 80.
4. Change to 4mm no. 34 and make the pale green leaves in the same way.
Hint: Remember to leave spaces between the leaves and branches. Refer to the pictures above as you work.This space is essential to prevent the trees from becoming too heavy, or too dominant in a design.
Make the Ginger tree
Make the branches
1. Form the grey branches with two strands of medium grey thread and use long straight stitches.
2. Change to two strands of light brown thread and make the pale brown branches in straight stitch,
as you did above. For the thick branches: make two or more rows of stem stitch alongside each other.
3. Thread up with one strand of a rust coloured thread and work the small rust-coloured branches
in fly stitch and straight stitch. Add a few loose French knots (as you did for the green tree) to create a fluffy texture.
4. Use one strand of dark brown thread and make the dark brown shadows in straight and fly stitch,
add in a few loose French knot as well.
5. Add the mauve branches and shadows as you did for the green tree.
Make the leaves
1. Use 2mm silk ribbon no. 86 and work the copper-coloured leaves
in ribbon stitch and fly stitch (as you did for the green tree) adding a few straight stitches for the thin, pointed leaves.
2. Then add the brown leaves in 4mm no. 21. Make loose, puffed ribbon stitches to create a varied texture.
Add the orange branches
1. Use one or two strands of an orange/rust thread and add the orange/rust coloured branches
(which are overlapping the leaves) in straight and fly stitch.
2. Add more colour and texture by working French knots between the leaves
in the same thread. Wrap the thread once or twice around your needle.
I do hope that you enjoyed this little lesson :)
Wishing you a HAPPY WEEKEND
Love
Di
♥
Shop Dicraft
Browse Dicraft
General Info
Get regular newsletters packed with tips, specials and new products!
Copyright © DI VAN NIEKERK. ALL RIGHTS RESERVED.


Leave a comment