# Type at least 1 character to search # Hit enter to search or ESC to close
Search
Browse by Category
-
-
Silk Ribbon and S...
Apr 05, 2025 -
Beautiful Ribbon ...
Mar 22, 2025
Recent Posts
- April 2025
- March 2025
- February 2025
- January 2025
Blog > How to make a sweet little daisy in silk ribbon embroidery

Little daisies are ideal for embellishing all kinds of gifts for that special person in your life. They are easy to make... and to brighten up your weekend, I will show you how ♫♬♪
.
This daisy is from one of my books: Ribbon embroidery and stumpwork and it's ideal for the beginner to the advanced embroiderer.
.
You will need:
- DMC (or similar) six-strand thread Medium brown Pale yellow Medium green - Di van Niekerk pure silk (or similar) ribbon 4mm number 33 green 4mm number 54 yellow
- Needles Size 7 or 8 crewel/embroidery needle for the thread Size 18 or 20 chenille needle for the ribbon.
- Stitches you will use: Straight/stab stitch; Twisted straight stitch; Fly stitch; Lazy Daisy; French Knot
.
Make the green stems and leaves Thread the chenille needle with the green ribbon and make a long, twisted straight stitch starting at the violet border and ending at the brown centre as shown above. Use a matching green thread and tiny stab stitches to catch the ribbon stem every 10mm or 3/8 inch to stabilise the stitch. Catch the edge of the ribbon and secure it onto the fabric, stitching so that the stitches are almost invisible. Use the green ribbon: make small fly stitches for the leaves. Start at the top, working down towards the base.
.
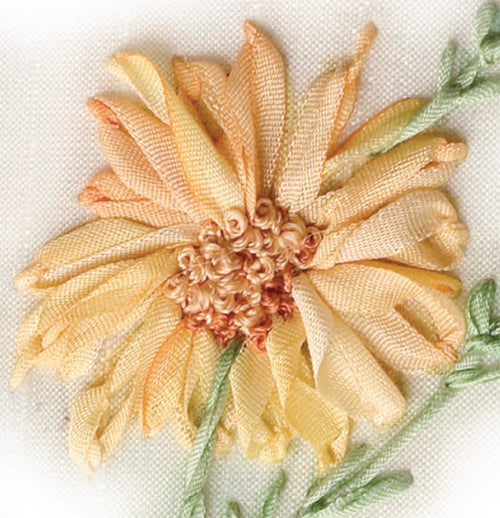
Make the yellow petals Use the yellow ribbon and work every alternate petal in detached/chain (lazy daisy) stitch. Hint: Vary the length of the petals, using the daisy (above) as an example. Some petals are long and thin and this is achieved by pulling the ribbon a little tighter than usual. A long anchoring stitch can be used to form petals with sharper points. Work the remaining petals, using detached chain stitch (lazy daisy) for some petals and twisted straight stitch for others. This will prevent the daisy from becoming too full and heavy.
.
Make the centre of the daisy  .
.
Separate two strands from the six. Thread the crewel/embroidery needle with two strands of brown thread. Fill in the outer part of the brown centre with French knots. For an interesting effect, wrap thread once around the needle for some knots and twice around the needle for others. Change to the yellow thread (use two strands as before) and fill in the entire shape to complete the daisy as shown.
.
.
The wild sorghum and the little snail from this same panel are shown on page 44 of the book. 
.
Hint: Keeping your work clean As the design is handled so often while being worked, it could become soiled, especially along the edge where it is stretched in the frame or hoop. To prevent marks, create a mask from another layer of fabric or sheets of tissue paper. Cut a piece of white fabric the same size as your embroidery panel. Place the hoop on top of it and mark a circle which is 3 to 4 cm (about 1 ½ inches) inside the hoop's edge and cut along the drawn line. Place this "window" on top of your embroidery panel and insert the layers in the hoop. Idea: You could use cling wrap or layers of tissue paper instead of fabric.
.
Cape Town has some this weekend so we are going hiking! Wish you could join us, but I will take some pictures. Remember to make time for yourself this weekend too. Till next time... Happy stitching and happy weekend :) Love Di ♥
Shop Dicraft
Browse Dicraft
General Info
Get regular newsletters packed with tips, specials and new products!
Copyright © DI VAN NIEKERK. ALL RIGHTS RESERVED.


Leave a comment