Welcome to my Blog. This a place to share and learn all things embroidery. Here I post inspirational stories and free lessons in the form of tutorials and guides. I also share tips, tricks and teach stitches and techniques.
You will also find free patterns and designs for you to unlock your creativity. It is a great place for any creative looking to learn or find inspiration in this art form.
To stay in the loop with Dicraft you can subscribe to my newsletter and stay in touch on Instagram and Facebook.
Blog >
Share & Learn
I have heard from a customer in the UK who kindly notified us that someone is pretending to be an authorised seller of my RES kit and panel on Etsy.
She is not one of our suppliers and never will be. She is "selling" my RES kit and accepts money knowing full well that she cannot supply the authentic kit. The price shown in the images is for the embroidery panel, which is more than 5 times the usual price.
Read More
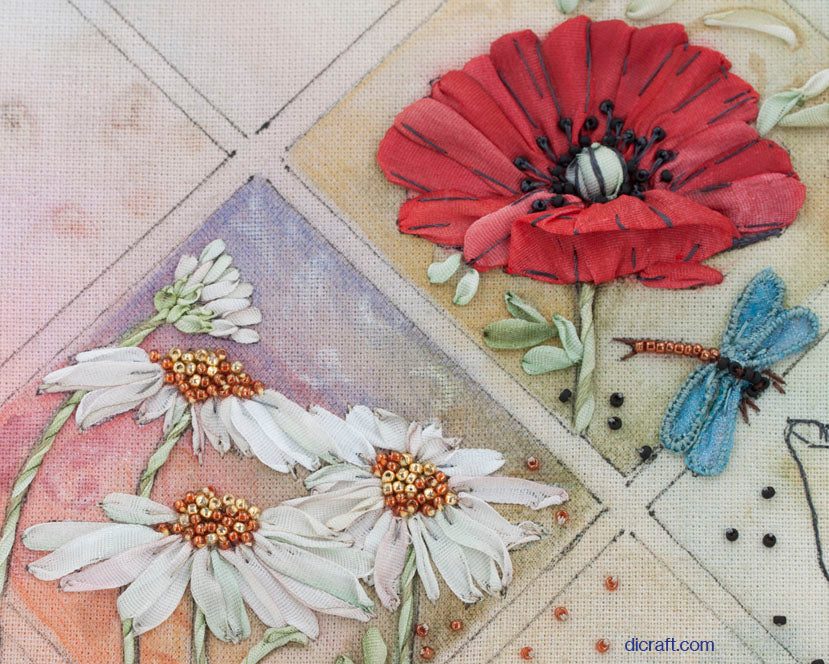
Silk Ribbon Embroidery Hint 9 by Di van Niekerk From a series of handy hints and tips for silk ribbon embroidery to save and keep for your collection. You are most welcome to share with your students or friends. I will be adding a new card every week until the series is complete. This is Hint 9… . . Stranded cotton is the most used thread for creative...
Read More
I simply love this beautiful piece by the super-talented Wendy Horner from Cape Town. From one of our popular designs titled “You and I” she made it in A3 size. Her teacher, Annamaria Kelly, from Kloof in KZN sent it to me and WOW Wendy surely has a flair for ribbon embroidery! . . Annamaria kindly shared her work with me, and she wrote: “Hello Di ...
Read More
Hints and tips by Di van Niekerk. Just about any thread can be used in ribbon embroidery, if you can thread it through the needle and bring in through the fabric. Otherwise, couch it in place. Just check that the threads are colourfast before starting. Experiment with different threads to see how different the stitches appear when working with various thicknesses.
Read More
Today I have a beauty to inspire you by a talented embroiderer from Brazil and her name is Luciana Maluf. Luciana wrote:
I began with ribbon embroidery using the eBooks I’ve bought from your site: Floral Vista, A perfect world in ribbon embroidery and Silk Ribbon embroidery. I really loved them and felt so inspired! The embroidery stiches I also incorporate from your books: the fly stiches and loose French knots for the tree, the loop stich at the grass, the shadows.
Read More
To twist the ribbon, twirl the needle once, twice, or more, depending on how many twists you would like in the stitch. Here are some examples of where the ribbon was twisted repeatedly until a cylindrical shape was formed for the stems. Secured onto the design with tiny stab stitches and matching thread worked between the twisted sections of the ribbon.
Read More
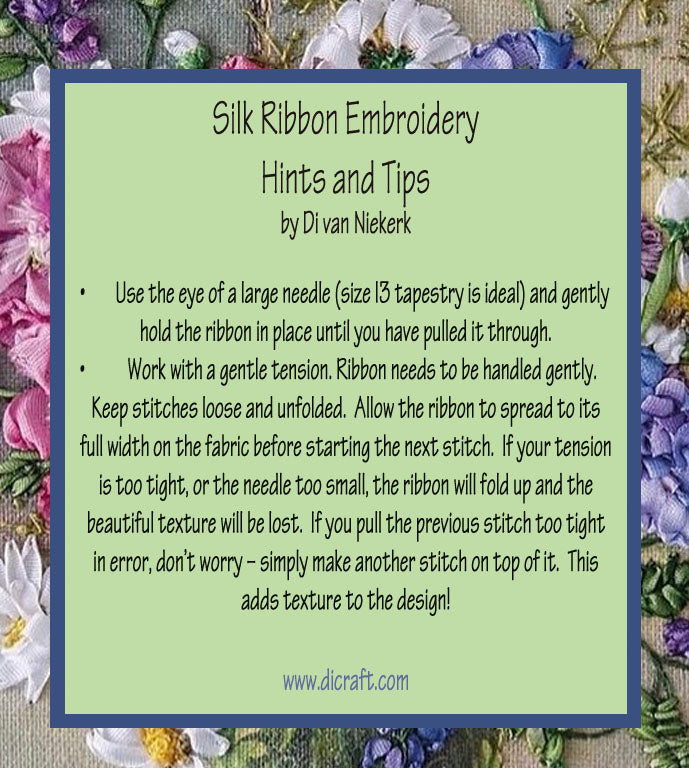
• Use the eye of a large needle (size 3 tapestry is ideal and gently hold the ribbon in place until you have pulled it through. Work with a gentle tension. Ribbon needs to be handled gently. Keep stitches
Read More
I thought I would show you this gorgeous piece titled Purple Rain, one of our projects and it's oh so beautiful! . Embroidered by Wanda Zmudzinska, it is her FIRST ribbon embroidery project! Don't you think it's lovely? . . I asked Wanda to tell us a little about herself and she replied: . " I just finished my first ribbon project Purple Rain. I bought a...
Read More
Remember to use short lengths of ribbon - no longer than 30 cm or 12 inches. Always use a large enough needle so the ribbon does not scrunch up when you form a stitch. Use your left (or right if you are left-handed) thumb to hold the ribbon flat as you pull it to the back. Only let go once the stitch is almost completed. This prevents the ribbon from twisting.
Read More
How to make Red Roses from "Lady in Red" Kit embroidered by Karen Nell Today I want to show you how these beautiful roses were created for our Lady in Red kit. . . . If you have added ribbon sculpting to your repertoire, then this one is for you. It sounds complicated but simply explained, it’s building a rose from the centre of the flower outwards. This is achieved...
Read More
Translation missing: en.general.search.loading